Mehr grün in deinem Leben.
Unser Minigarten schafft eine grüne Oase in jedem Zuhause. Ob auf der Fensterbank oder dem Balkon, er bringt dich zurück zur Natur und macht Lust auf frische Leckereien.
Alles was du brauchst, ist schon drin:
Erde, hochwertiges Saatgut und ein Pflanzstäbchen. Die Verpackung besteht aus einem wasserfesten Beutel, der direkt als Pflanz- oder Anzuchttopf verwendet werden kann. Los geht's!

Wir haben gerade ein super Angebot für dich: Beim Kauf von 4 Minigärten schenken wir dir einen fünften gratis dazu! Lege dafür einfach fünf Minigärten deiner Wahl in deinen Warenkorb und gib im Checkout den Code "Minigarten" ein – schon geht der fünfte Minigarten auf uns!


Growing kits and mini gardens – the perfect gift
From now on, gardening happens on the windowsill! Whether herbs, vegetables, or fruits, with our mini gardens these treats will be just an arm’s length away. A planting stick, soil, and seeds – the mini garden contains all the ingredients so you can get started right away. Our beautiful growing kits are perfect as gifts and presents for all hobby gardeners and gardeners-to-be.
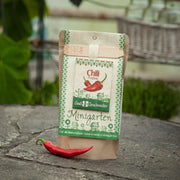
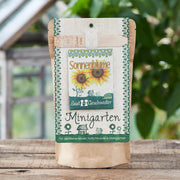
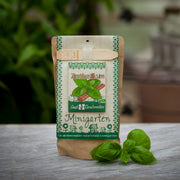
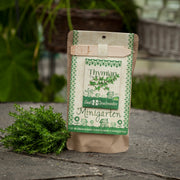
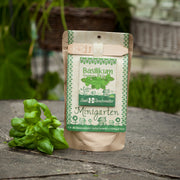
Mini Garden - The Gardener Starter Kit
With this mini garden, you can start and enjoy the planting season on your windowsill. This small bag is filled with the best garden soil and finest seeds. Just cut open the bag, sprinkle the seeds into the soil, keep moist, and place your mini garden in a warm and sunny spot. With a little love and patience, you can proudly watch the first steps of your sprouts in no time.
To ensure successful cultivation, you will find instructions and special planting tips for each variety inside the seed packet. If your little sprouts start to feel cramped in their home and you have enough space, simply tear open the bag and plant them outdoors.
What is a growing kit?
Starting plants is nothing other than raising young plants. They are similar to children in many ways; both need a lot of care, love, and time, but also favorable conditions to grow. You long for homegrown vegetables or fresh herbs but are new to the growing business? Then you are exactly right with us!
We also call our growing kits mini gardens, but they should not be confused with small miniature green spaces. They are for all those who want to start their little protégés early without exposing them too soon to the whims of nature. Because sometimes you just can't do without starting plants. Some plant varieties, such as cucumber and tomato, but also pumpkin, are not native here and therefore need different conditions to survive. They need the warmth and protection of your own home or greenhouse so that they are strong enough later to withstand the demands of nature. Growing plants at home is very common and prevents seedlings from dying too early because the weather was unpredictable again. This also applies to native vegetables and fruits! Although it is much more likely that they will sprout vigorously in the garden bed without help, starting them early speeds up the process and ultimately leads to a higher yield.
The right timing
Now you know what plant starting is all about. But at least as important as the why is the when, because the right timing for seed starting and sowing can make a big difference and often determines the success of your harvest. Since you’re here, we’ve put together a rough overview for you:
| Timing | Plant type |
|---|---|
| February | Pepper and tomato plants |
| March | Cabbage vegetables (broccoli, cauliflower, kohlrabi, red and white cabbage, lettuce) |
| April | Brussels sprouts and popular herbs basil, dill |
| May | Endive and kale |
| June | Chinese cabbage |
To find the right variety for you, you can also use the "Sowing in" filter at the top of this page.
Seed starting – How does it work?
When you know when to start your seedlings, it’s time to place their seeds on moist seed starting soil and press them down lightly. Seed starting soil is ideal for young plants because it is especially low in salt and germs. This makes your little ones particularly strong and less prone to disease. After gently pressing down, cover the seeds with a little soil—ideally as much as the seed’s size and definitely no more than 1 to 2 cm. But be careful! The exception here is light germinators, which should be barely or not at all covered so they can get enough sunlight.
Light germinators in our seed starting kits include: basil, dill, mint, oregano, coneflower, thyme, lavender, chamomile, carrot, wild garlic, lettuce, rosemary, lemon balm. But don’t worry: the planting instructions included with each variety explain exactly how to do it.
Let love sprout! And your plants too
If you hesitate to place the seeds directly into the soil, you can of course pre-soak them to be absolutely sure. There are special soaking tablets available to help you with this.
In our seed-starting kits, you will of course find high-quality seed-starting soil that creates perfect growing conditions for your green friends. There are mini-greenhouses for home that provide an optimal climate for the plants, but our durable seed-starting kit bag also creates good conditions. In addition, your plant needs to breathe, so you can simply poke a few holes in the cover. If you haven’t pre-germinated the seeds in peat pellets, you must keep the seeds moist. It’s best to use rainwater or water that is low in lime. If you only have hard water at home, you can soften it with water filters. Dry seeds will not start to germinate, so double-check that the seed-starting soil is as moist as it should be.
After that, it is important to keep the container as warm and sunny as possible. Warm in this case means a comfortable room temperature of 22-25 degrees Celsius, although this can vary depending on the plant species. Well, now you have to be patient. Depending on the plant type, it can take several weeks for the first shoots to see the light of day.
After Germination
Since young plants, like small children, are very fragile, you should leave them alone for a while during this time. When you see the first green stems sprouting, you must make sure to avoid waterlogging. Because that could harm your young plant in the long term. Forgot whether you watered them this morning? It happens! Just feel the soil and see how moist it is. After the first shoots appear, it is also important to keep the outside temperature around 18 degrees Celsius.
Pricking Out Plants
Pricking out simply means transplanting your young plants at a greater distance from each other, or thinning them out. This must be done when they start to get in each other's way and the small stems already rise about 10 centimeters above the soil. Then they are strong enough to survive transplanting. To do this, carefully dig up the plants and separate the roots from each other. The best way to do this is with a small spoon or a pricking stick. Especially if you plan to start plants more often, such a stick is useful.
When transplanting, be careful to damage as few fine roots as possible, as the plant absorbs water through them. Once you have successfully transplanted them into their own pots, they can now form good root balls. To stimulate root growth, there is pricking soil, which, unlike seed-starting soil, contains some fertilizer.
The Big Repotting
If your pricked-out plants become too large for their pots, you can either release them into your garden or get a larger planting container.
Of course, you don’t just have to repot your grown plants but also your other houseplants from time to time. Take a look at their roots. If they grow upwards or are already coming out of the drainage holes at the bottom, your plant is telling you it definitely needs more space to develop. You should always pay attention to this when buying plants to check if you need to repot them.
The mini garden in action

What our customers say

Absolutely recommendable! Super fast delivery – keep it up, guys :) I would order here again.

Dear urban gardeners,
I discovered you through Wasa... what luck! You run your site and shop so lovingly and sympathetically! Personalized emails that make you feel like the customer really matters to you! Beautiful design and nice texts – everything done right!
Absolutely lovely! I wish you much success – you deserve it from my point of view! :-)
Best regards!
Steffi
I gave the growing kit as a gift. It was very well received. The set was lovingly wrapped. After a few weeks, the first seeds sprouted.
Arrived quickly at home and is now growing great.
I ordered a sunflower kit and it arrived on time. The packaging looks super nice, I’m thinking about not wrapping it at all and just giving it as a gift. I’m curious if the flower will grow!

Now I’m really going to ruin the rest of the summer for my neighbor. I hope the weeds grow meters high.
Can only recommend this product.
The appearance is appealing, the soil is good, and the seeds are of excellent quality. The seeds started to sprout in less than 4 days. Almost all the seeds have sprouted.
I am incredibly convinced! The seeds all sprouted after about 5 days and are growing well, but I would have appreciated more detailed instructions.
Which variety of thyme is it? It would generally be very practical to have at least a basic list of botanical facts.
So the service is already very good. Nice and friendly. The idea of the mini garden is so lovely. You can leave it right in the bag – it’s a nice eye-catcher. Such a gift is something special and also ideal for people without a garden.